Fixing SSH Remote Host Identification Has Changed Warnings
SSH key authentication is a secure method of connecting to your server via SSH. When the SSH host key that is utilized for a connection changes and you attempt to connect to the server using the old host key's information an error similar to the one below will be produced.
⚠️ Please note that values such as the fingerprint, username, SSH host key path, IP addresses, and other information shown below will differ as these are unique to your server or account.
@@@@@@@@@@@@@@@@@@@@@@@@@@@@@@@@@@@@@@@@@@@@@@@@@@@@@@@@@@@
@    WARNING: REMOTE HOST IDENTIFICATION HAS CHANGED!     @
@@@@@@@@@@@@@@@@@@@@@@@@@@@@@@@@@@@@@@@@@@@@@@@@@@@@@@@@@@@
IT IS POSSIBLE THAT SOMEONE IS DOING SOMETHING NASTY!
Someone could be eavesdropping on you right now (man-in-the-middle attack)!
It is also possible that a host key has just been changed.
The fingerprint for the RSA key sent by the remote host is
f5:f5:2b:40:cd:88:13:82:d8:7e:3d:9d:45:ce:ce:e6
Please contact your system administrator.
Add correct host key in /Users/jsmith/.ssh/known_hosts to get rid of this message.
Offending RSA key in /Users/jsmith/.ssh/known_hosts:12
RSA host key for 192.168.56.101 has changed and you have requested strict checking.
Host key verification failed.
On many systems the known_hosts file contains the listing of previous connected hosts along with the public key associated with said connection. Each time a user connects with an new or unknown host its public key is added to this file. Some systems and software applications can use other components to store this information as well. If the related public host key stored in known_hosts, or the equivalent component, no longer matches the SSH host key on your server: the above warning, or a similar warning for your software of choice, will be displayed.
Sometimes this message can be an indicator of a compromise if you know that no legitimate changes to the SSH host key have been made. This is not always the case though. In instances where known changes are made, such as re-creation of the SSH host keys for your server or the redeploy of the server itself, this error simply means that your locally stored SSH host key information needs to be updated to match the new SSH host key utilized on the server.
⚠️ If you are uncertain if your server has been compromised or whether the host key has just changed, and you have service with us, please contact our support team.
Follow the directions below to resolve this issue.
Windows SSH Client
SSH client software is not installed on Windows by default. Windows 10 or later has an optional SSH client that can be installed with instructions in this link from Microsoft.
If you are using a version of Windows that does not have access to this tool from Microsoft a third party SSH client can be used (see the tabs with directions for PuTTy and Bitvise).
When using the SSH client installed for Windows 10 or later the steps below will guide on how to remove a host entry from the known_hosts file to resolve the error when connecting:
-
Locate the folder containing the SSH client known_hosts file.
ℹ️ The file is found at one of the following locations when using the example user "jsmith":
%USERPROFILE%\ssh\known_hosts
%USERPROFILE%\.ssh\known_hosts
C:\Users\jsmith\ssh\known_hosts
C:\Users\jsmith\.ssh\known_hosts
-
Open the known_hosts file with a plain text editor.
⚠️ Be sure to use a text editor that does not append rich text characters such as Notepad++.
You shouldn't use editors like Microsoft Word, OpenOffice Writer, etc. since they will make incompatible changes to the file once you save it.
-
Locate the line number shown in the error.
ℹ️ Using the above error as an example this would be line 12 since that is the number that appears after the colon.
-
Delete the line that correlates to the line number in the error.
-
Save and close the known_hosts file.
Try connecting to the SSH server one more time. It should work this time, once you accept the new host key.
PuTTy
If you are using PuTTy, then follow these steps:
-
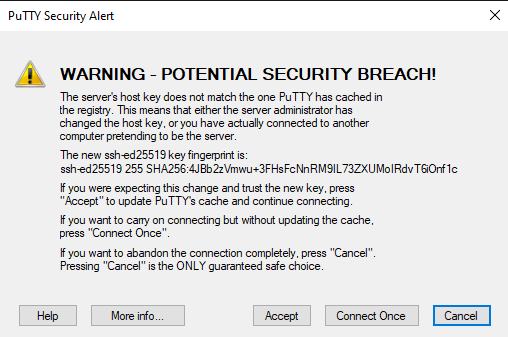
When attempting to connect to your server a dialogue prompt will appear requesting to accept the changes in the SSH host key fingerprint. It will look similar to the screenshot below except with values appropriate for your connection/server:

-
Click Accept to proceed and let PuTTY automatically adjust the related values for the connection for future sessions. Alternatively, you can click Connect Once to only accept the change for this session. Choosing this option will not alter the stored SSH values for your server and will result in the fingerprint mismatch error appearing the next time you attempt to connect to this server.
If your attempt to reconnect works after doing this, then you are done.
Bitvise
-
Open the Bitvise SSH client and proceed to attempt to connect to your server.
-
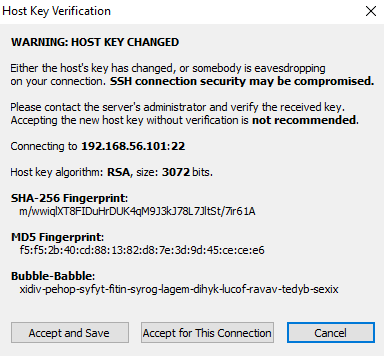
When attempting to connect to your server a dialogue prompt will appear requesting to accept the changes in SSH host key fingerprint. It will look similar to the screenshot below except with values appropriate for your connection/server:

-
Choose Accept and Save if you want your Bitvise client to automatically make the necessary changes to alter the stored SSH host key information for the server permanently.
-
If you chose Accept for This Session the connection will go through this time, but the next time you attempt to connect, you will see this error again.
Once you are able to get into the server, you are done.
MacOS or Linux
In this example, we'll edit everything via the Terminal.
On a Mac, the Terminal application is located at /Applications/Utilities/Terminal.app. On Linux, the exact location may vary depending on your distro. Most distro GUIs have easy-to-access shortcuts to the Terminal app, though.
-
Once you have a Terminal window up, type the following to edit the needed file:
nano ~/.ssh/known_hosts✅ Linux Tip
On Linux, if you prefer to edit this file with a different text editor like vi or vim, feel free to do so. On Macs, these alternate text editors are not installed, but nano is.
-
Now we need to find to the line that contains the incorrect public key. The error you receive should tell you this. In the example above, it is here:
Offending RSA key in /Users/jsmith/.ssh/known_hosts:12The number after the colon in the error is the line number in the known_hosts file. In this example, it is line 12.
-
Press Control-W to enter search mode in nano.
-
Now press Control-T to switch to the "jump to line" mode.
-
Type the number of the line with the problem key (12 in the example above), Press Return/Enter.
-
Now you will be at the beginning of the line with the problem key. Press Control-K to delete this line.
-
To exit and save this change, press Control-X. You will be asked if you want to save the modified buffer. Press Y to start the save process. Then press Return/Enter when File Name to Write: is displayed.
If all went well, you should find yourself back at the terminal prompt. You should now test connecting to the server via SSH again. This time, the system should act like you've never connected to that server before. If it still complains about an offending key, it is possible you have two entries for the same server in your known_hosts file. Make a note of the new line number after the colon and follow all of the steps above one more time.